How to buildCode samples with line highlighting
For this blog I want to be able to present source code samples in which I can highlight individual lines. In this step-by-step guide I show how to build a React component which provides this feature.
TL;DR
- Our envisioned component would be used like this:
<Code language="typescript" highlightedLines="3-4, 8">…</Code>where the source code to be shown goes in between theCode-tags. - The source code for the ready-to-use component can be found at the end of this blog post.
- We use the library highlight.js to syntax-highlight our code. For simplicity and better performance, our Code component calls highlight.js directly instead of using the automatic detection of code samples offered by the library.
- The highlighting of individual lines of code we implement ourselves since highlight.js doesn't provide this. (In contrast, Prism.js does have a plugin for this.)
- We implement the line highlighting by rendering multiple layers on top of each other: One layer renders the syntax-highlighted code using highlight.js, while two auxiliary layers render different backgrounds and other styling depending on whether a line is highlighted or not.
- In order to achieve the layering of elements we use CSS absolute positioning.
The goal
When presenting code samples on a blog, documentation, or talk, they usually have syntax highlighting as a minimum. However an additional feature which I find very helpful is the ability to highlight individual lines of source code. This allows to emphasize a certain part of the code while the non-highlighted code provides additional context to the reader. It helps the reader for instance to understand specific changes to be made in existing code.
For this we want to have a component, let's call it Code, to which we provide
the source code to be shown as the children prop. With the language prop we
tell it which programming language to use for the syntax highlighting. And the
highlightedLines prop takes a comma-separated list of line ranges which we
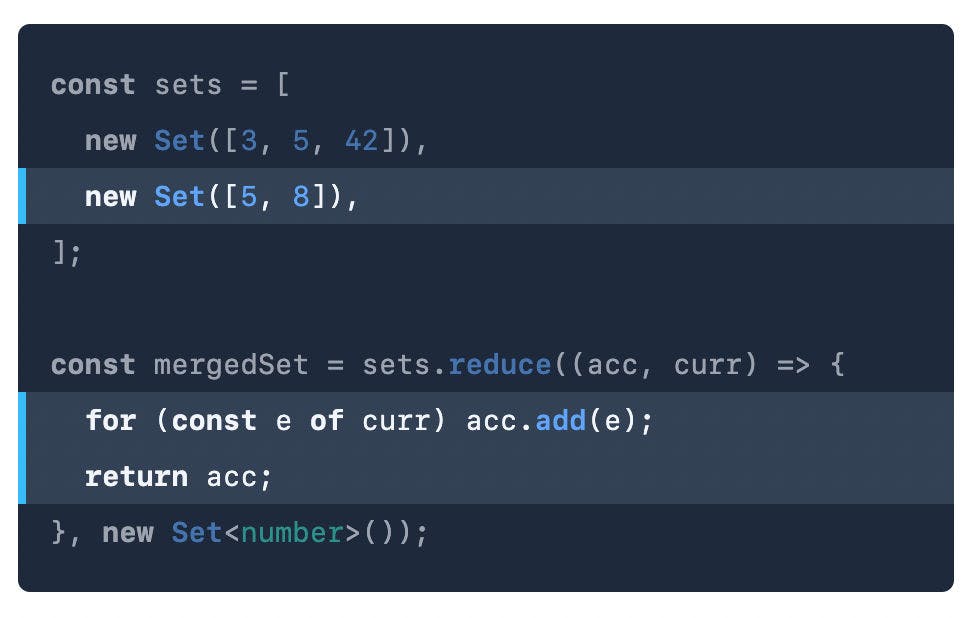
want to highlight. The usage of the component for the code sample shown at the
beginning of this blog post would look like this:
<Code language="typescript" highlightedLines="3, 7-8">
  {`const sets = [
  new Set([3, 5, 42]),
  new Set([5, 8]),
];

const mergedSet = sets.reduce((acc, curr) => {
  for (const e of curr) acc.add(e);
  return acc;
}, new Set<number>());`}
</Code>
Overview
In the following I will show how to build this component, which is exactly how it is implemented on this blog (at the time of writing this post). In the first part we build a simple version of the Code component which only has syntax highlighting. The second part then explains how to extend this component in order to support highlighting individual lines.
For the syntax highlighting I use highlight.js. This popular library exists now for more than a decade and supports about 200 programming languages.
I want to note that there is an alternative library called Prism.js which does have a plugin for highlighting individual lines—so with this, developing our own solution for this feature would not be necessary. If you are just looking for having code samples with line highlighting and are open to use something else than highlight.js, I suggest to consider Prism.js (I haven't tried it myself, but it seems to be fairly popular).
My solution is not that complicated either though, I promise 😉 I already had it working when I found out about Prism.js, so I didn't have the need to switch to Prism.js. Plus I learned a ton from developing this and the technique used for the implementation could certainly be helpful for similar problems. So I'm glad I went down this route and it might be worth it to follow along!
Besides highlight.js, I use Tailwind CSS for the styling. If you are not into Tailwind you can of course substitute it for any other styling mechanism. The Tailwind class names are intuitive to understand, so it should not be a problem to translate it to CSS. I'll also explain the most important stylings in the text. If you are unsure about what a class name does, just head over to the Tailwind homepage and enter it into the Quick Search box.
What might be a bit confusing in this blog post is the term highlighting. On the one hand there is syntax highlighting—a pretty basic requirement for code samples. On the other hand there is the line highlighting of individual code lines which we want to have additionally. I'll try to be explicit with these terms so that it is clear what is meant. (It doesn't help either that the library is called highlight.js but only does the syntax highlighting 😅)
Syntax highlighting
First steps with highlight.js
I guess this doesn't need explanation:
$ yarn add highlight.jsThe syntax highlighting with highlight.js works by enriching the given code with HTML markup which has specific CSS classes. Therefore we need to import one of the CSS themes available in highlight.js:
// wherever your CSS is included, e.g. in _app.tsx for Next.js
import "highlight.js/styles/github.css";
Instead of importing the CSS from the highlight.js package, you can also roll
your own by taking the
default.css from GitHub
and adapting it—that's what I did for this blog.
highlight.js can discover code samples automatically and highlight them. For
this, you would call the highlightAll function when the client-side code loads
(e.g. just directly in a script element if the whole document was server-side
rendered or in an initial useEffect Hook for a React-based app):
hljs.highlightAll();This will discover all <pre><code>-elements on the page and syntax-highlight
them. The programming language to be used for the syntax highlighting can be
hinted using a language-… class—if not specified, highlight.js will try to
detect the language automatically.
<pre><code class="language-typescript">function foo() {
  console.log("hello, world");
}

foo();</code></pre>
Wrapping it into a component
The above is fine for basic usage, but since we are using React—which makes it
easy to create components—we don't need highlight.js to run through all our DOM
and try to find code samples. We can just simply create a Code component which
calls highlight.js manually for the given code and then uses the returned markup
to render the code sample. If using SSG or SSR like with Next.js, this also has
the advantage that the syntax highlighting is already performed at build time/on
the server for the initial page load.
Our component should take the language name as prop and the source code as
children prop:
<Code language="typescript">
  {`function foo() {
  console.log("hello, world");
}

foo();`}
</Code>
It is generally advisable to put the code into a template string. This way you won't have to escape characters which are reserved in HTML/JSX (especially important if you want to show HTML or JSX 😅). If you use a code formatter like Prettier, as I do, this practice is even more important as otherwise the code would get formatted and thus messed up!
The manual API of highlight.js works as follows: We call the highlight
function and pass the source code and the language to it and it returns a result
object containing the HTML of the syntax-highlighted code:
const html = hljs.highlight(
  `console.log("hello, world");`,
  { language: "typescript" },
).value;
With this we can build our Code component:
export default function Code({ children, language }: CodeProps) {
  const html = hljs.highlight(children, { language }).value;
  return (
    <pre className="px-4 py-4">
      <code
        className="block overflow-x-auto text-slate-100"
        dangerouslySetInnerHTML={{ __html: html }}
      />
    </pre>
  );
}

export type CodeProps = { children: string; language: string };
This is a very rough prototype which will run the syntax highlighting on every render—but we'll leave the optimization for the end.
Using dangerouslySetInnerHTML feels weird and it does that on purpose—it
should always be used very carefully to prevent creating XSS vulnerabilities. In
our case it is fine as the HTML is produced by highlight.js and does not come
from user input.
On the pre and code elements we now added a few Tailwind classes to improve
the styling. Usually, when using highlight.js, these styles are provided by the
theme using the hljs class on code. (And with the auto-detection feature of
highlight.js shown above, this class would get added automatically.) However in
our case we need to have a bit more control over the styling, especially later
when we add the line highlighting. Therefore we instead add Tailwind classes
which mimic styles usually provided by the highlight.js theme.
Line highlighting
Now we have a simple Code component to display a code sample nicely. Next, we want to optionally support highlighting specific lines in a code sample. Here is again how it should look like:
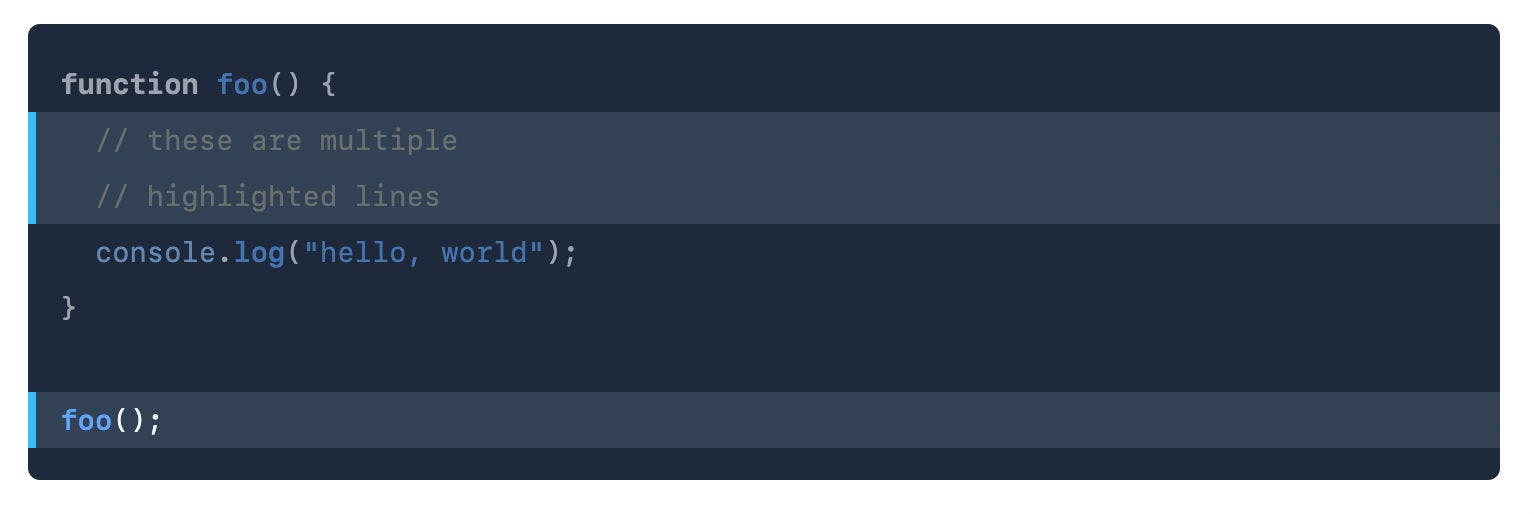
An important detail to note here is that those lines which are not highlighted are actually faded out a bit. This improves the highlight effect and makes it clear that the non-highlighted lines are just there for context. For code samples without highlighted lines, we don't want this fading-out of course—then the lines should appear as normal.
When writing the code sample, we want to be able to specify the highlighted
lines on the Code component. The lines to highlight are separated by comma and
we can either specify single line numbers or line number ranges (e.g. 5-8). So
for the above code sample we would write this:
<Code language="typescript" highlightedLines="2-3, 7">
  {`function foo() {
// these are multiple
// highlighted lines
console.log("hello, world");
}

foo();`}
</Code>
In order to achieve the desired design, we need to be able to define the styles of invidual lines of the code sample as either highlighted or not highlighted (or neutral if the code sample does not have highlighted lines).
How it does not work: Manipulating the HTML
My first, naïve idea for this was to take the HTML output produced by
highlight.js, split it into lines and wrap each line into additional markup that
can then be styled. Well, after going down that rabbit hole for a bit… I
realized that this does not work. The problem is that highlight.js might
produce markup that spans multiple lines. For instance, there are of course
languages with multi-line tokens, e.g. template strings in
JavaScript/TypeScript. Besides that, highlight.js does not only produce markup
around tokens, but also around complete expressions; e.g. it adds a
language-xml class around JSX code within a JavaScript sample—and these are
usually multi-line. So if we now add additional markup around each line for the
line highlighting, we can quickly end up with nesting errors in the markup,
which messes up our code sample pretty bad as you can imagine 😏.
Okay, so we can rule out messing around with the highlight.js output (and with that also manipulating the input—it would not only suffer from the same problem, but would even break the syntax highlighting completely).
How it works: Using multiple layers
The solution is to work with layers: We render our syntax-highlighted code sample into one layer as if we would not have line highlighting. Then we render a separate layer on the same position which highlights the desired lines. Such layers can be easily implemented using CSS. Both layers should of course have the same dimensions and we need to be able to style the correct parts of the line highlighting layer—we'll see how to pull this off in a moment.
But first, let's visualize how the layers work together. For a simple implementation, we could work with only two layers as just described. For our desired design, we'll have an additional third layer, but the principle stays the same.
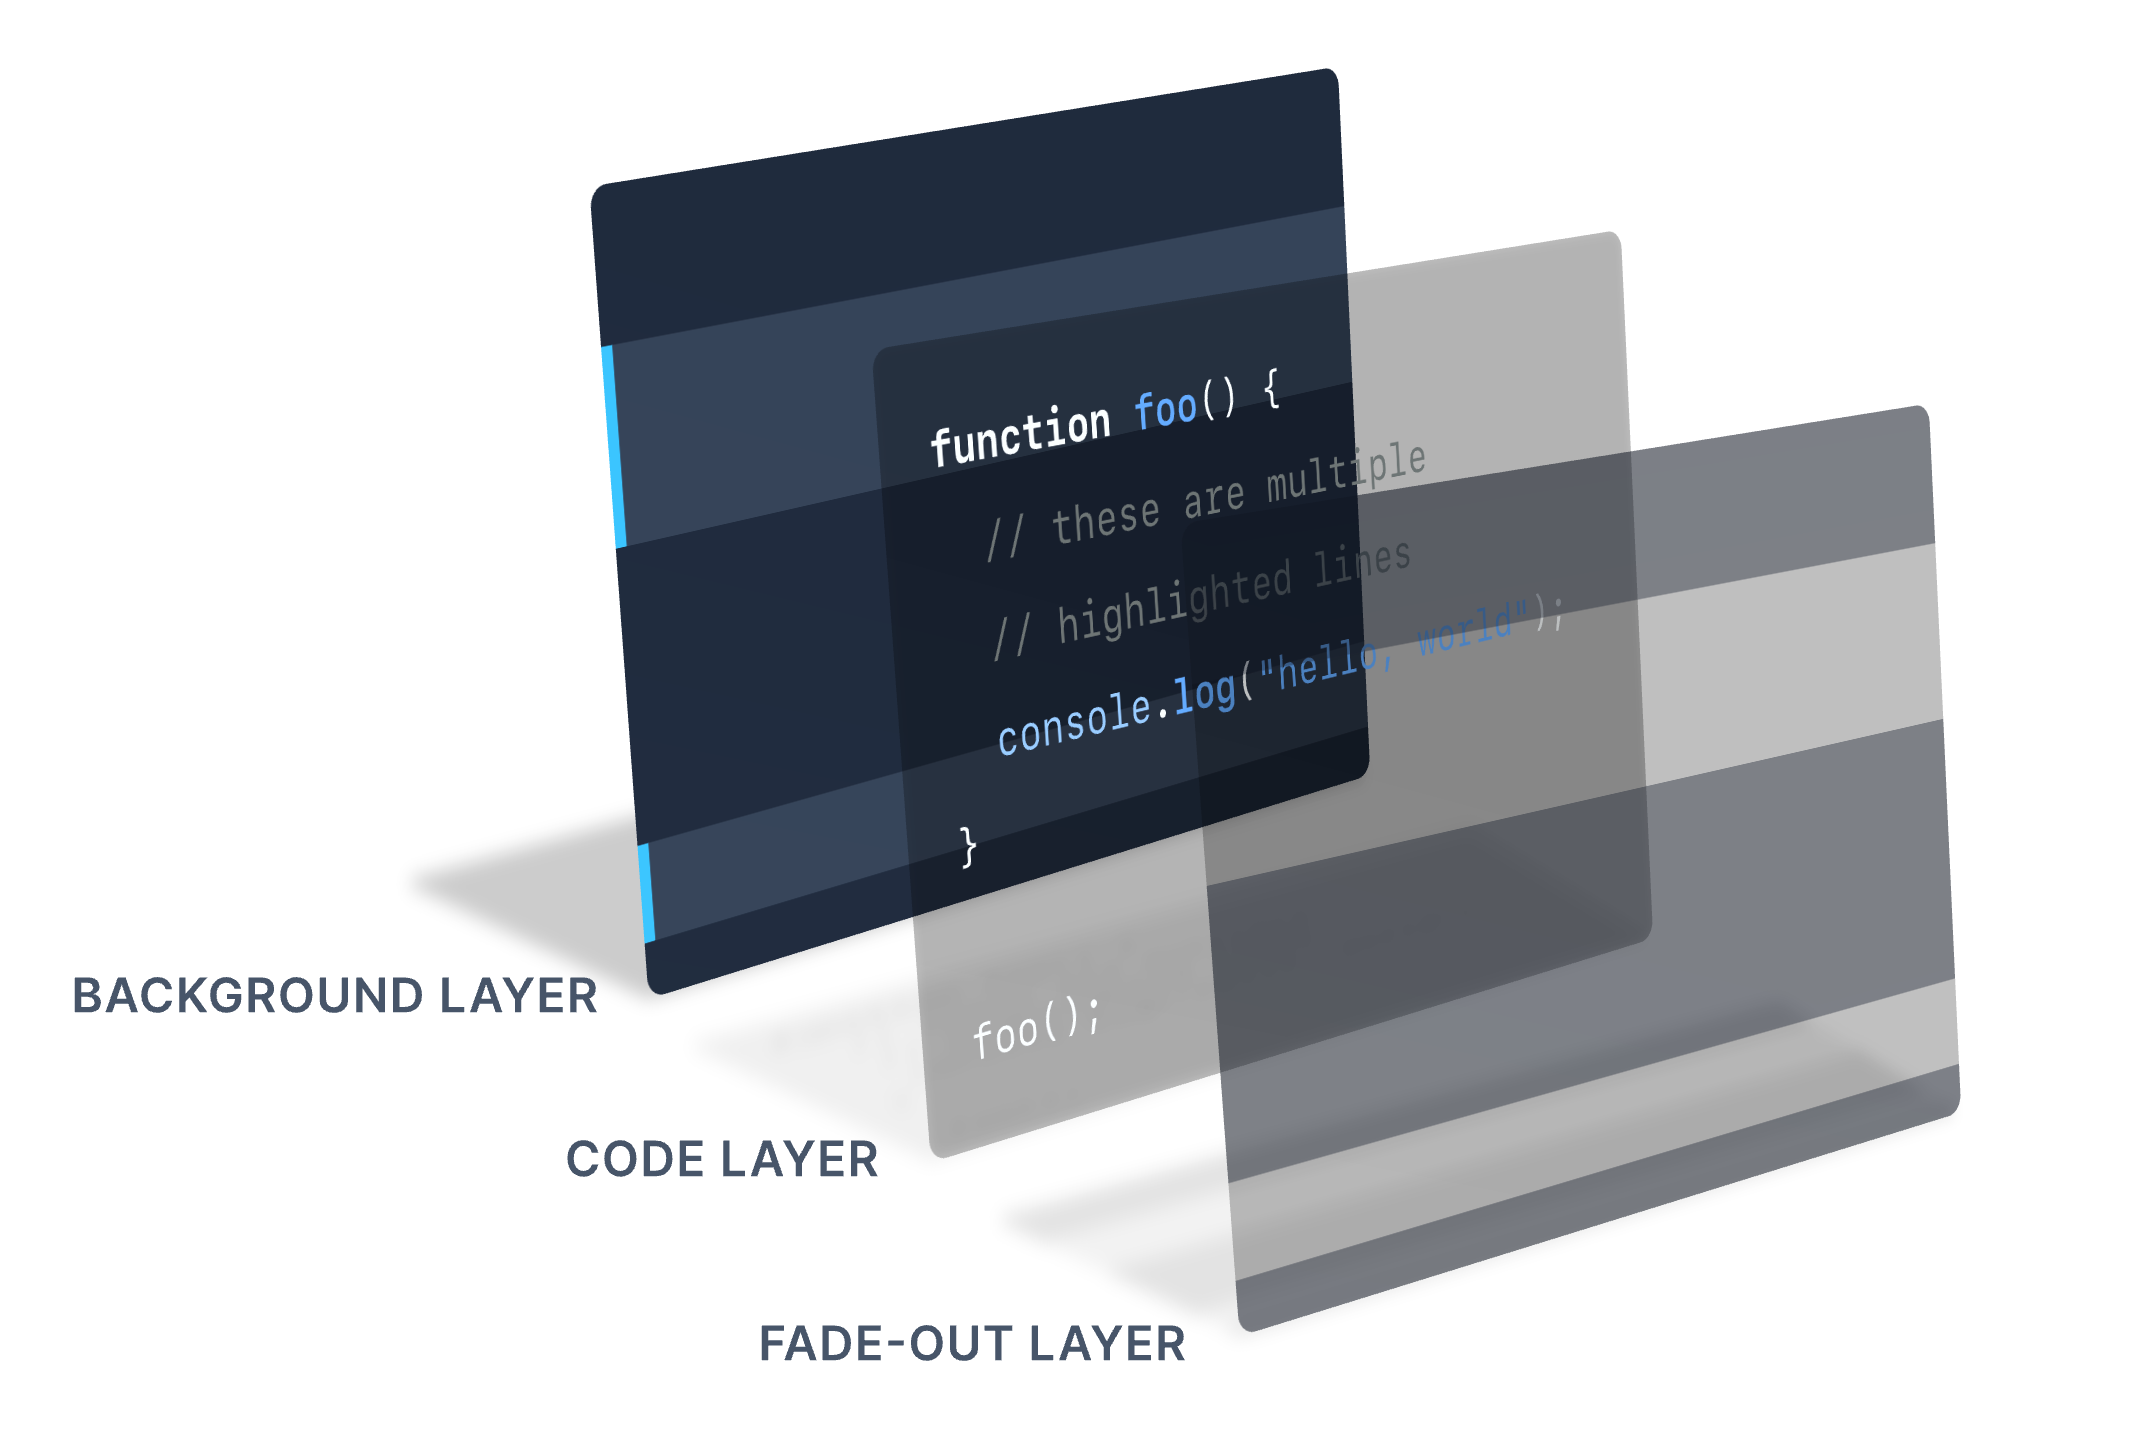
The Background Layer will provide a brighter background and an accented left border for our highlighted lines. Being the background, it is naturally the lowest layer. On top of it, we have the Code Layer which contains the syntax-highlighted code sample. It has a transparent background, so that the line highlighting of the Background Layer can shine through. The third, topmost layer we'll call the Fade-out Layer and it provides the subtle fade-out of non-highlighted lines. For this effect it has to style the non-highlighted lines with a dark background color in combination with some degree of transparency. The highlighted lines however are completely transparent on this layer so that the bright highlight background and the full font color of the code can come through.
Code Layer
Now let's build this. First, we wrap our Code component into an additional div
with relative position. This allows us to give the child elements, our layers,
an absolute position within the Code component. The pre element with the
syntax-highlighted code now becomes our Code Layer.
function Code({ … }: CodeProps) {
  const html = …
  return (
    <div className="relative my-8 rounded-md bg-slate-800 text-sm leading-loose">
      <pre className="px-4 py-4">
        <code
          className="block overflow-x-auto text-slate-100"
          dangerouslySetInnerHTML={{ __html: html }}
        />
      </pre>
    </div>
  );
}
Sizing the auxiliary layers
For the other two layers (let's call them auxiliary layers from now on), there is a little challenge: How can we achieve that they have the same dimensions as our Code Layer? The width is easy, as our layers are block elements and therefore anyway take the full width available to them by default. But what about the height?
Our Code Layer's height grows with the number of lines which our code sample has. In order to achieve the same height for the two auxiliary layers, we could calculate their height by multiplying this number of lines with the line height and then set it on the layer elements as fixed height. This approach could then also be used for determining the line-highlighted and non-line-highlighted areas on the layers and set the heights of respective block elements. If I understand it correctly, this is the approach which the Line Highlight plugin of Prism.js uses.
An alternative is to use a line-based approach: The auxiliary layers simply
contain the same number of lines as our Code Layer, making them all the same
height. We don't need to repeat the code itself, but just empty lines are fine.
We can produce these empty lines by using a pre element:
<pre>
  {"\n"}
  {"\n"}
  {"\n"}
  …
</pre>
I like this approach better, as I don't need to determine the line height used in the code sample. By just using the same line height and paddings for the whole Code element, the layers naturally have the same height. (Maybe I am missing something, but it just seems much easier to me.)
For the line highlighting we need to provide a background color and other
styling on individual lines. For this we just add inline-block span elements
to each line. They need to have full width (w-full) and a contain space, so
that they fully span the code sample horizontally and occupy the height of a
line. The line break must remain outside of the span (otherwise the elements
would sit side-by-side horizontally instead of stacking vertically).
<pre>
  <span className="inline-block w-full …"> </span>{"\n"}
  <span className="inline-block w-full …"> </span>{"\n"}
  <span className="inline-block w-full …"> </span>{"\n"}
  …
</pre>
Helper functions
Now we know how to produce a correctly sized layer with lines that we can style:
We just need to generate one span per line and give it the desired styles
depending on whether it's a highlighted or non-highlighted line. For this we
ideally know which are the highlighted line numbers and can then just check per
line if the current line number is contained in them. The following function
creates an array with the line numbers based on the input code:
function getLineNumbers(code: string): number[] {
  return code.split("\n").map((_, index) => index + 1);
}
On the Code component we wanted to specify the highlighted lines as
comma-separated line ranges or single line numbers, e.g. 3, 5-8, 12. Therefore
we should have a function to parse such a string and bring it into an
appropriate data structure. It should be easy to determine if a certain line
number is a highlighted line or not. For this it makes sense to collect all
highlighted line numbers, i.e. iterate over the line ranges, expand them (e.g.
5-8 to 5, 6, 7, 8), and add all of the line numbers to a
Set.
This object provides the has method with which we can ask it whether a
specific line number is contained in it.
Let's see the code for this. First a function to parse a single line range and return an array of numbers representing it:
import range from "lodash/range";

function parseLineRange(lineRangeRaw: string): number[] {
  let [begin, end] = lineRangeRaw.trim().split("-");
  if (!end) end = begin;

  return range(Number(begin), Number(end) + 1);
}
The range function from
lodash creates an array of incrementing numbers in the
specified range (not including the end, therefore we increase it by 1). If you
don't want to use lodash, this should be easy to implement yourself/find on
Stack Overflow. It will be the only function we need from lodash.
Now let's go one level up and implement the function to parse a comma-separated
list of such line ranges. It calls the previously shown function for each line
range string and then uses flatMap to obtain a set of line numbers.
function parseLineRanges(lineRangesRaw: string): Set<number> {
  return new Set(lineRangesRaw.split(",").flatMap(parseLineRange));
}
Background Layer
Alright, with all this in place we can finally implement the Background Layer. We'll create it as a separate component and will then integrate it into the Code component as a layer below the Code Layer.
function BackgroundLayer({ code, highlightedLines }: BackgroundLayerProps) {
  const _highlightedLines = parseLineRanges(highlightedLines);
  return (
    <pre className="pointer-events-none select-none py-4" aria-hidden={true}>
      {getLineNumbers(code).map((ln) => (
        <Fragment key={ln}>
          <span className={classNames("inline-block w-full", {
            "border-l-4 border-sky-400 bg-slate-700": _highlightedLines.has(ln),
          })}> </span>
          {"\n"}
        </Fragment>
      ))}
    </pre>
  );
}

type BackgroundLayerProps = {
  code: string;
  highlightedLines: string;
};
The Background Layer takes the code and the highlighted lines specification as
props and based on this then generates the appropriately styled span elements.
Non-highlighted lines simply don't get a background color so that they appear
with the overall background of the Code component. (In the illustration above I
left this detail out for simplicity.) Highlighted lines get a brighter
background color and an accent-colored left border.
Since this component just renders auxiliary elements and uses text lines only as
means to achieve correct dimensions, we prevent the user from interacting with
it (pointer-events-none and select-none) and hide it from screen readers (
aria-hidden).
Now we'll position the Background Layer in our Code component:
function Code({ children, highlightedLines }: CodeProps) {
  const html = …
  return (
    <div className="relative my-8 rounded-md bg-slate-800 text-sm leading-loose">
      <BackgroundLayer code={children} highlightedLines={highlightedLines} />
      <pre className="absolute top-0 w-full px-4 py-4">
        <code
          className="block overflow-x-auto text-slate-100"
          dangerouslySetInnerHTML={{ __html: html }}
        />
      </pre>
    </div>
  );
}
As it is the lowest layer, we put the Background Layer as the first child
element. As it has the default static position, it is responsible for the height
of the Code component. The Code Layer then needs to be shown on top of the
Background Layer. Therefore we give its pre element an absolute position and
move it to the top of the Code component (top-0). As it is now absolutely
positioned, we also need to tell it explicitly to have full width ( w-full).
Fade-out Layer
OK, we know the pattern, let's do the Fade-out Layer now. Don't worry, we'll get rid of the duplication and optimize some things afterwards. For now let's focus on making it work. The FadeOutLayer component basically looks the same as the BackgroundLayer component, with just a few differences in the styling of the elements:
function FadeOutLayer({ code, highlightedLines }: FadeOutLayerProps) {
  const _highlightedLines = parseLineRanges(highlightedLines);
  return (
    <pre
      className="pointer-events-none absolute top-0 w-full select-none py-4"
      aria-hidden={true}
    >
      {getLineNumbers(code).map((ln) => (
        <Fragment key={ln}>
          <span className={classNames("inline-block w-full", {
            "bg-slate-800 opacity-40": !_highlightedLines.has(ln),
          })}> </span>
          {"\n"}
        </Fragment>
      ))}
    </pre>
  );
}

type FadeOutLayerProps = {
  code: string;
  highlightedLines: string;
};
As the Code Layer, this layer needs to use absolute positioning too. And here we only want to give the non-highlighted lines a special styling in order to create the fade-out effect (dark background color and low opacity), while the highlighted lines are completely transparent.
Back in the Code component, we add the Fade-out Layer after the Code Layer so that it sits on top of it:
function Code({ children, highlightedLines }: CodeProps) {
  const html = …
  return (
    <div className="relative my-8 rounded-md bg-slate-800 text-sm leading-loose">
      <BackgroundLayer code={children} highlightedLines={highlightedLines} />
      <pre className="absolute top-0 w-full px-4 py-4">
        <code
          className="block overflow-x-auto text-slate-100"
          dangerouslySetInnerHTML={{ __html: html }}
        />
      </pre>
      <FadeOutLayer code={children} highlightedLines={highlightedLines} />
    </div>
  );
}
We made it work!
With this in place, our line highlighting works as desired. We can write our code sample like this:
<Code language="typescript" highlightedLines="2-3, 7">
  {`function foo() {
  // these are multiple
  // highlighted lines
  console.log("hello, world");
}

foo();`}
</Code>
And we get this result, with non-highlighted and highlighted lines styled as we wanted it:
Make it right, make it fast
Finally let's clean up and improve a few things:
- Although it's fairly small, I would say the Code Layer should go into its own component for consistency. That also allows us to hide the generation of the HTML as an implementation detail within the Code Layer component.
- The layering is a concern of the Code component. Thus we should specify the
Tailwind classes related to this (
absolute top-0 w-full) in the Code component and not within the layers. The Layer components should only define how they look on the inside, but not how they are positioned. Similarly, we need to have a consistent vertical padding on the layers so that they are aligned and have the same height. Therefore we also want to set thepy-4class in the Code component. - The Background and Fade-out Layers are basically the same. Therefore we
introduce a common AuxiliaryLayer component to eliminate the code
duplication.
BackgroundLayerandFadeOutLayerare then just thin wrappers around it. Within the AuxiliaryLayer component we can improve the code by moving out the weirdspan, space, and line break combination into a separate LinePlaceholder component. - The functions
parseLineRangesandgetLineNumbersare called in both auxiliary layers. Let's eliminate these duplicated calls by moving them one level up to the Code component. Instead of passing the code and highlighted line specifications to the auxiliary layers as props, we'll then pass the results of the functions to them. - The generation of the HTML using highlight.js is an expensive calculation for
which it is likely worth it to memoize it and not call it on every render.
Therefore we'll wrap the call in a
useMemoHook. - The line highlighting should be an optional feature—when we use the Code component without specifying highlighted lines, the code should be shown without the fade-out effect for non-highlighted lines. To achieve this, we can simply not render the FadeOutLayer component if no highlighted lines have been specified. We also need to extend further places in our code so that it can cope with that.
- The full import of highlight.js is huge, more than 280 KB gzipped 😱. If you
only need a couple of languages, it is better to only import the library core
and the individual languages and then register the languages. In order to
ensure that I don't specify a language on the Code component which I have not
imported, I use a
string literal
union type for the
languageprop.
The complete code with all these final improvements can be found at the end of this blog post.
Conclusion
So that's it, we now have a Code component based on highlight.js and with support for line highlighting!
As mentioned before, as an alternative to using highlight.js and building the line highlighting ourselves as shown in this blog post, I recommend to also consider Prism.js, which has a plugin for this. I haven't tried it out, but the demo looks good and it seems to be fairly popular. For me, my current approach works for now. Plus the insights gained in the development of this might be helpful for similar problems. If I encounter any problem with it going forward, I will definitely look into switching to Prism.js or an alternative library (do you know other competitors worth considering?).
If you have any feedback or questions, I'm happy to hear from you on Twitter. Would you implement this feature differently? Let me know, what you think!
Appendix: Complete code
import range from "lodash/range";
import { useMemo } from "react";
import classNames from "classnames";
import hljs from "highlight.js/lib/core";
import hljsJavascript from "highlight.js/lib/languages/javascript";
import hljsTypeScript from "highlight.js/lib/languages/typescript";
import hljsShell from "highlight.js/lib/languages/shell";
…

hljs.registerLanguage("javascript", hljsJavascript);
hljs.registerLanguage("typescript", hljsTypeScript);
hljs.registerLanguage("shell", hljsShell);
…

export default function Code({
  children,
  language,
  highlightedLines,
}: CodeProps) {
  const lineNumbers = getLineNumbers(children);
  const _highlightedLines = parseLineRanges(highlightedLines);
  return (
    <div className="my-8 rounded-md bg-slate-800 text-sm leading-loose">
      <div className="relative">
        <BackgroundLayer
          className="py-4"
          lineNumbers={lineNumbers}
          highlightedLines={_highlightedLines}
        />
        <CodeLayer className="absolute top-0 w-full py-4" language={language}>
          {children}
        </CodeLayer>
        {_highlightedLines && (
          <FadeOutLayer
            className="absolute top-0 w-full py-4"
            lineNumbers={lineNumbers}
            highlightedLines={_highlightedLines}
          />
        )}
      </div>
    </div>
  );
}

export type CodeProps = {
  children: string;
  language: Language;
  highlightedLines?: string;
};

export type Language =
  | "javascript"
  | "typescript"
  | "shell"
  | …;

function getLineNumbers(code: string): number[] {
  return code.split("\n").map((_, index) => index + 1);
}

function parseLineRanges(
  lineRangesRaw: string | undefined
): Set<number> | null {
  if (!lineRangesRaw) {
    return null;
  }

  return new Set(lineRangesRaw.split(",").flatMap(parseLineRange));
}

function parseLineRange(lineRangeRaw: string): number[] {
  let [begin, end] = lineRangeRaw.trim().split("-");
  if (!end) end = begin;

  return range(Number(begin), Number(end) + 1);
}

function CodeLayer({
  className,
  children,
  language,
}: CodeLayerProps) {
  const html = useMemo(
    () => hljs.highlight(children, { language }).value,
    [children, language]
  );

  return (
    <pre className={classNames("px-4", className)}>
      <code
        className="block overflow-x-auto text-slate-100"
        dangerouslySetInnerHTML={{ __html: html }}
      />
    </pre>
  );
}

type CodeLayerProps = {
  className: string;
  children: string;
  language: string;
};

function BackgroundLayer({
  className,
  lineNumbers,
  highlightedLines,
}: BackgroundLayerProps) {
  return (
    <AuxiliaryLayer
      className={className}
      highlightedLineClassName="border-l-4 border-sky-400 bg-slate-700"
      lineNumbers={lineNumbers}
      highlightedLines={highlightedLines}
    />
  );
}

type BackgroundLayerProps = {
  className: string;
  lineNumbers: number[];
  highlightedLines: Set<number> | null;
};

function FadeOutLayer({
  className,
  lineNumbers,
  highlightedLines,
}: FadeOutLayerProps) {
  return (
    <AuxiliaryLayer
      className={className}
      nonHighlightedClassName="bg-slate-800 opacity-40"
      lineNumbers={lineNumbers}
      highlightedLines={highlightedLines}
    />
  );
}

type FadeOutLayerProps = {
  className: string;
  lineNumbers: number[];
  highlightedLines: Set<number>;
};

function AuxiliaryLayer({
  className,
  highlightedLineClassName = "",
  nonHighlightedClassName = "",
  lineNumbers,
  highlightedLines,
}: AuxiliaryLayerProps) {
  return (
    <pre
      className={classNames("pointer-events-none select-none", className)}
      aria-hidden={true}
    >
      {lineNumbers.map((ln) => {
        const highlighted = !!highlightedLines && highlightedLines.has(ln);
        return (
          <LinePlaceholder
            key={ln}
            className={classNames({
              [highlightedLineClassName]: highlighted,
              [nonHighlightedClassName]: !highlighted,
            })}
          />
        );
      })}
    </pre>
  );
}

type AuxiliaryLayerProps = {
  className: string;
  highlightedLineClassName?: string;
  nonHighlightedClassName?: string;
  lineNumbers: number[];
  highlightedLines: Set<number> | null;
};

function LinePlaceholder({ className }: LinePlaceholderProps) {
  return (
    <>
      <span className={classNames("inline-block w-full", className)}> </span>
      {"\n"}
    </>
  );
}

type LinePlaceholderProps = {
  className: string;
};